
Q-Feeds delivers curated indicators of compromise (IPs and domains) on a schedule. The OPNsense plugin is purpose-built to consume the IP feeds, and the official documentation assumes you’ll feed the domain side into Unbound. If you’re running AdGuard Home as your primary DNS resolver instead of Unbound — as I am — that integration path doesn’t apply directly, and you have to wire the domain feeds in manually.
A two-layer threat intelligence setup is only as good as the DNS path that feeds it. This post walks through wiring Q-Feeds into OPNsense (IP layer) and AdGuard Home (DNS layer), and then — the part that turned out to matter most — actually forcing every device on the network to use that DNS path, instead of just offering it.
The original version of this writeup covered Parts 1 and 2 (the two-layer setup). What follows below those is Part 3: closing the bypass. If you stop after Part 2, your filtering applies only to devices that cooperate with your DNS settings, which is a smaller fraction of modern hardware than you’d think.
Honest framing: This is a category change, not an incremental improvement. You’re moving from “I offer filtered DNS” to “I enforce filtered DNS.” That gives you real visibility and consistent filtering across heterogeneous devices, but you take on operational responsibility for DNS for your whole network. AdGuard becomes a single point of failure. Plan for that before you start.
Prerequisites
- OPNsense 25.x or newer
- AdGuard Home running on OPNsense (e.g. via
os-adguardhome-maxit) or on a separate host - A Q-Feeds account at
tip.qfeeds.com— the Community tier is free and includes OSINT-derived IP and domain feeds - An API token generated from the Q-Feeds portal under Manage API Keys
- An OPNsense Interface Group (call it
LOCAL_VLANSor similar) containing every internal interface you want protected
Token hygiene: the token grants read access to your subscribed feeds. Treat it like a password. Don’t paste it into screenshots, chat tools, or pull request descriptions. Rotate it if it leaks. By the end of this post the token will live in two places (AdGuard config + OPNsense plugin), so if you back up those configs externally, the token rides along.
Part 1 — AdGuard Home (DNS layer)
This part hasn’t changed from the original post. Q-Feeds’ Community tier returns plain newline-separated domain lists that AdGuard parses natively as a custom blocklist — no transform script needed.
Verify the API response format
curl -s "https://api.qfeeds.com/api?feed_type=malware_domains&download=0&api_token=YOUR_TOKEN" | head -20
You should get a plain list of domains, one per line:
wave.taro5lin.surf
star.brightreef.surf
spark.taro5lin.surf
sky.brightreef.surf
...
If you get JSON, HTML, or an error, stop here and fix the auth before continuing.
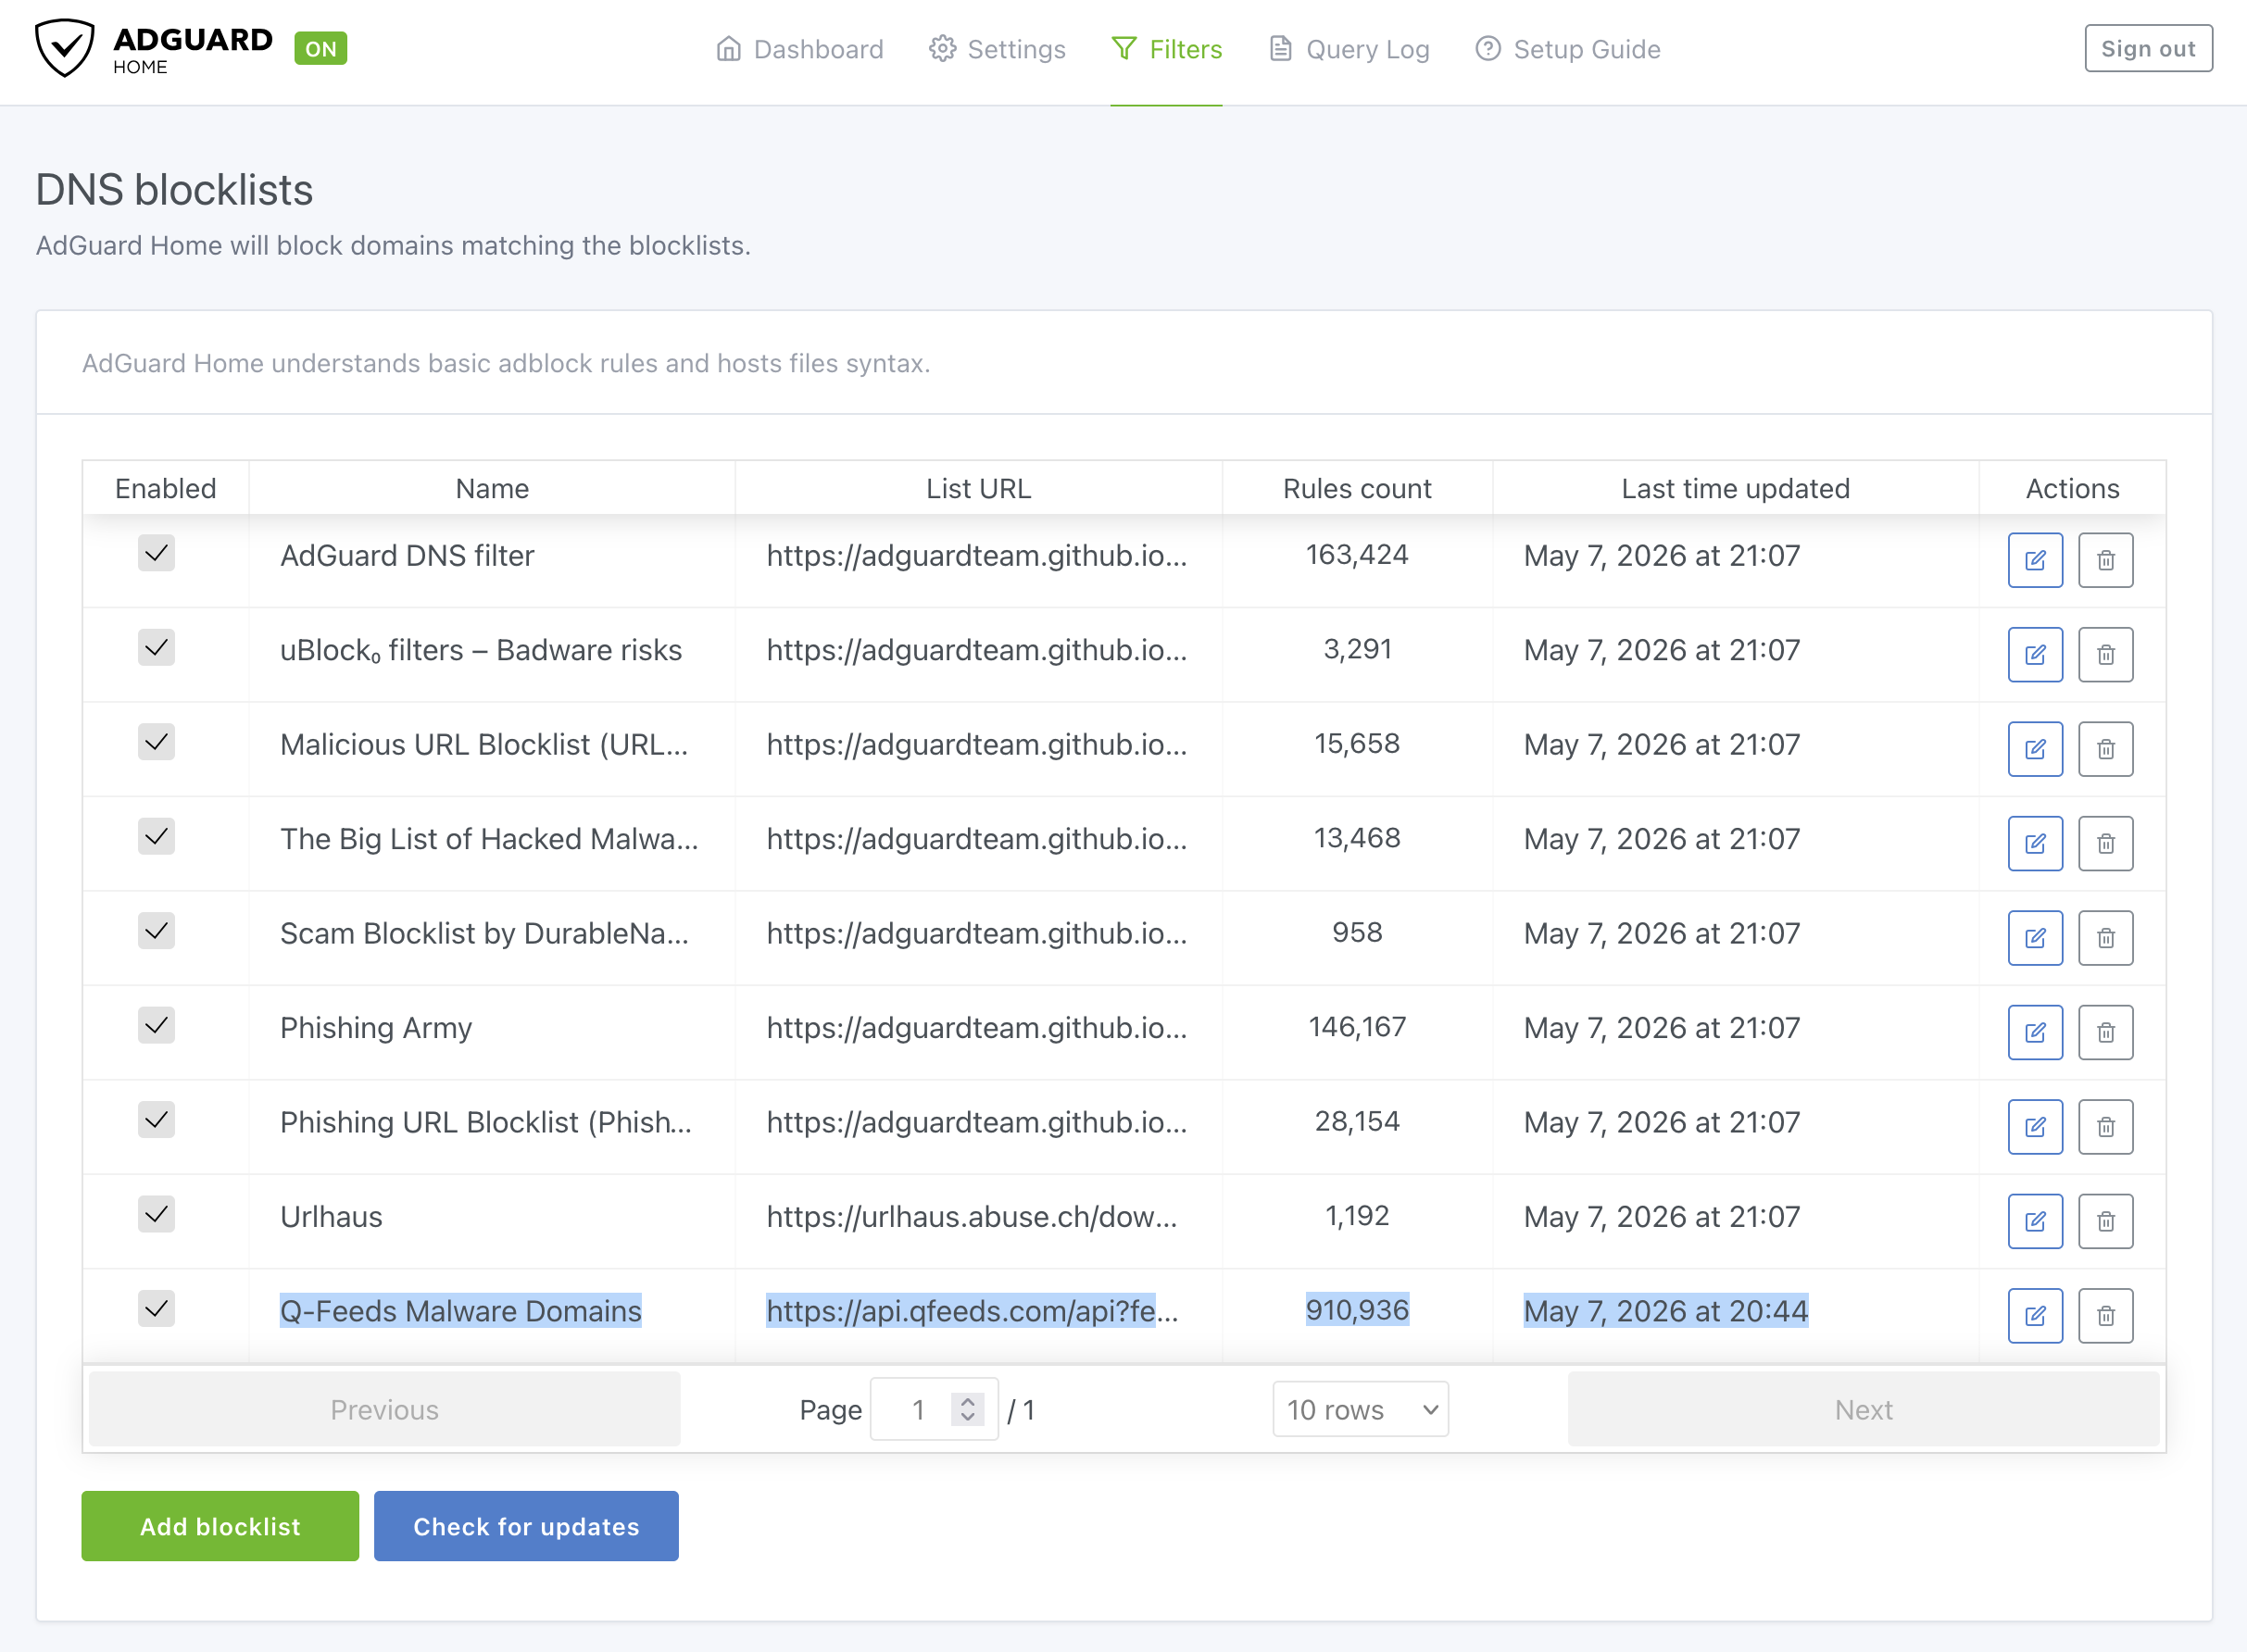
Add as a custom blocklist
AdGuard Home → Filters → DNS blocklists → Add blocklist → Add a custom list.
| Field | Value |
|---|---|
| Name | Q-Feeds Malware Domains |
| URL | https://api.qfeeds.com/api?feed_type=malware_domains&download=0&api_token=YOUR_TOKEN |
Save. AdGuard fetches immediately. Check the Rules count column — it should show tens of thousands. If it’s 0, the URL didn’t return parseable content.
Refresh interval
Settings → General settings → Filters update interval → 1 hour.
Q-Feeds asks for 20-minute minimum on their end; AdGuard’s shortest preset above that threshold is 1 hour. The Community tier only updates every 24 hours upstream anyway, so anything more frequent just wastes calls.
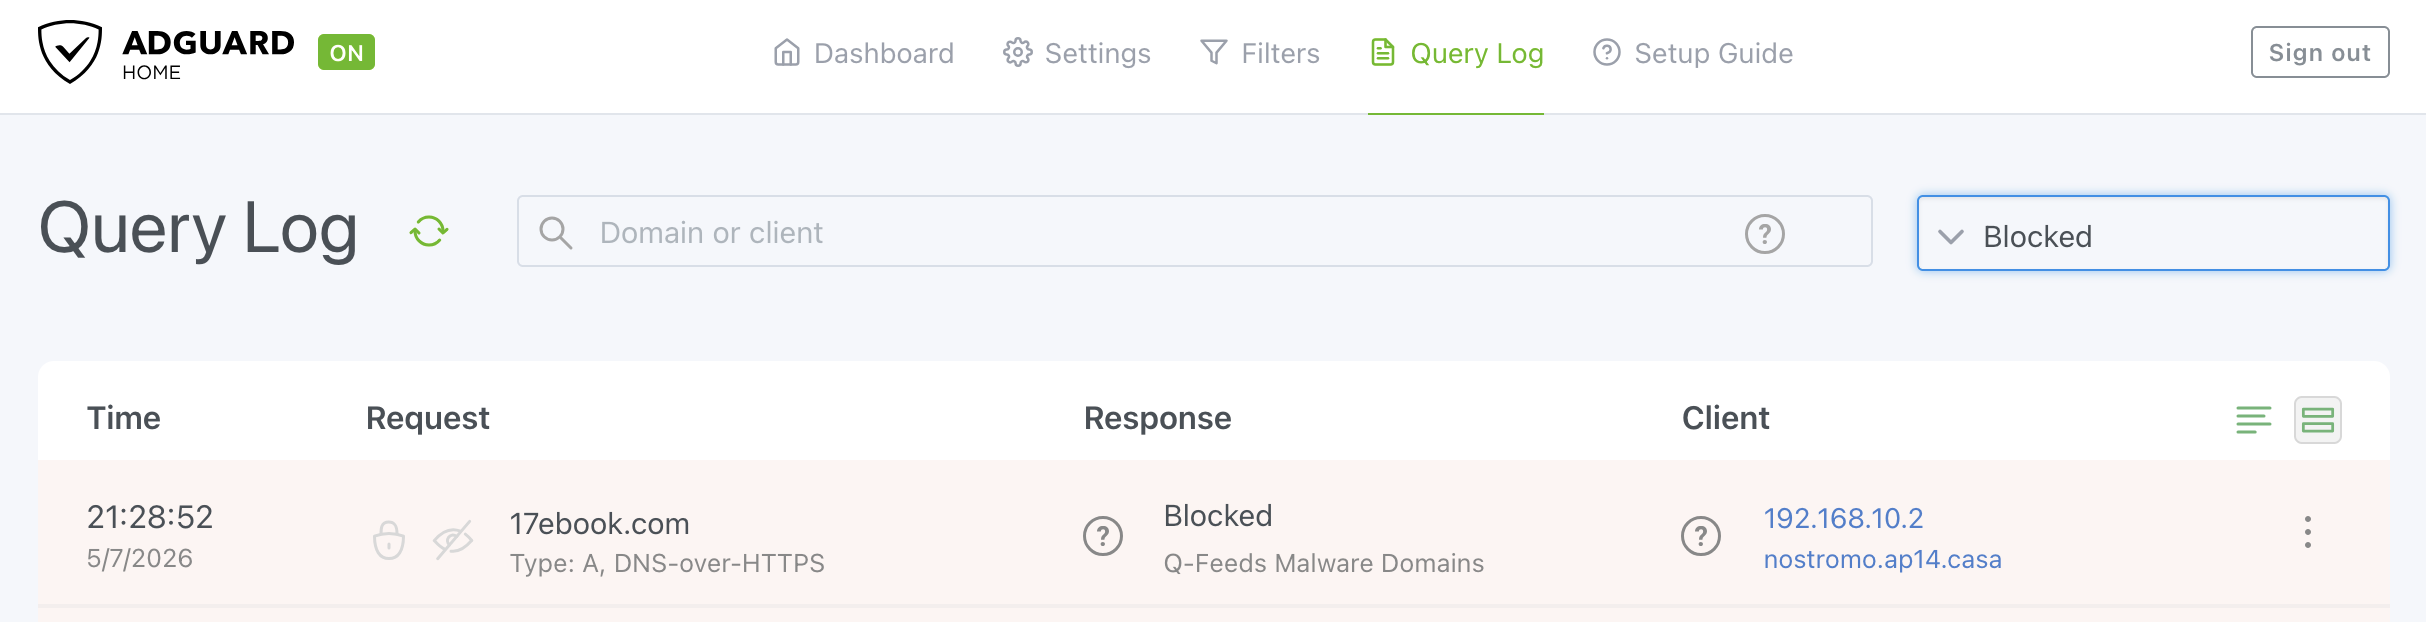
Verify
nslookup wave.taro5lin.surf <your-adguard-ip>
Expected: 0.0.0.0, NXDOMAIN, or REFUSED depending on your AdGuard block mode. Any of those mean the domain matched the Q-Feeds list. In AdGuard Home → Query Log, the entry should show “Blocked by Q-Feeds Malware Domains.” That per-list attribution is the main reason for using a custom blocklist instead of chaining through Unbound.
What this buys you, by itself: DNS-layer blocking for devices that use AdGuard as their resolver. Which, until Part 3, is a much smaller subset of your devices than you think.
Part 2 — OPNsense firewall (packet layer)
Also unchanged from the original. The Q-Feeds plugin loads the malicious IP feed into a pf table and we reference it from a block rule on the LOCAL_VLANS group.
Install and configure the plugin
System → Firmware → Plugins → search os-q-feeds-connector → install.
Security → Q-Feeds Connect → Settings:
- Paste your API token
- Enable the service
- Leave “Register domain feeds” off — AdGuard handles domains. Loading them into Unbound too would just duplicate work and split block reporting across two systems.
- Apply
Bump the pf table size
Default is 200,000 entries. Q-Feeds IP feeds can exceed that and silently truncate.
System → Settings → Tunables → Add:
| Field | Value |
|---|---|
| Tunable | net.pf.request_maxcount |
| Value | 2000000 |
| Description | Increase pf table size for Q-Feeds |
Apply. The tunable applies on next table reload; a manual flush + reload of the alias picks it up without a reboot. Verify it took:
sysctl net.pf.request_maxcount
Should report 2000000.
Verify the alias
Firewall → Aliases → confirm __qfeeds_malware_ip exists. Content count will be empty until a rule references it — pf only loads tables that are referenced by an active rule. That’s normal at this stage; the count fills in once you add the block rule below.
Block rule on LOCAL_VLANS
Firewall → Rules → LOCAL_VLANS → Add:
| Field | Value |
|---|---|
| Action | Block |
| Interface | LOCAL_VLANS |
| Direction | in |
| TCP/IP Version | IPv4+IPv6 |
| Protocol | any |
| Source | any |
| Destination | alias __qfeeds_malware_ip |
| Log | ✓ |
| Category | Threat Intelligence |
| Description | Block internal → Q-Feeds malicious IPs |
Save and apply.
One rule, every internal interface in the group. Add a new VLAN later → add it to the group → covered automatically.
Group-rule precedence: rules placed on an Interface Group are evaluated before rules on the individual interface tabs. That’s intentional here — you want the threat block to fire before any VLAN-specific allow rule could pass the packet.
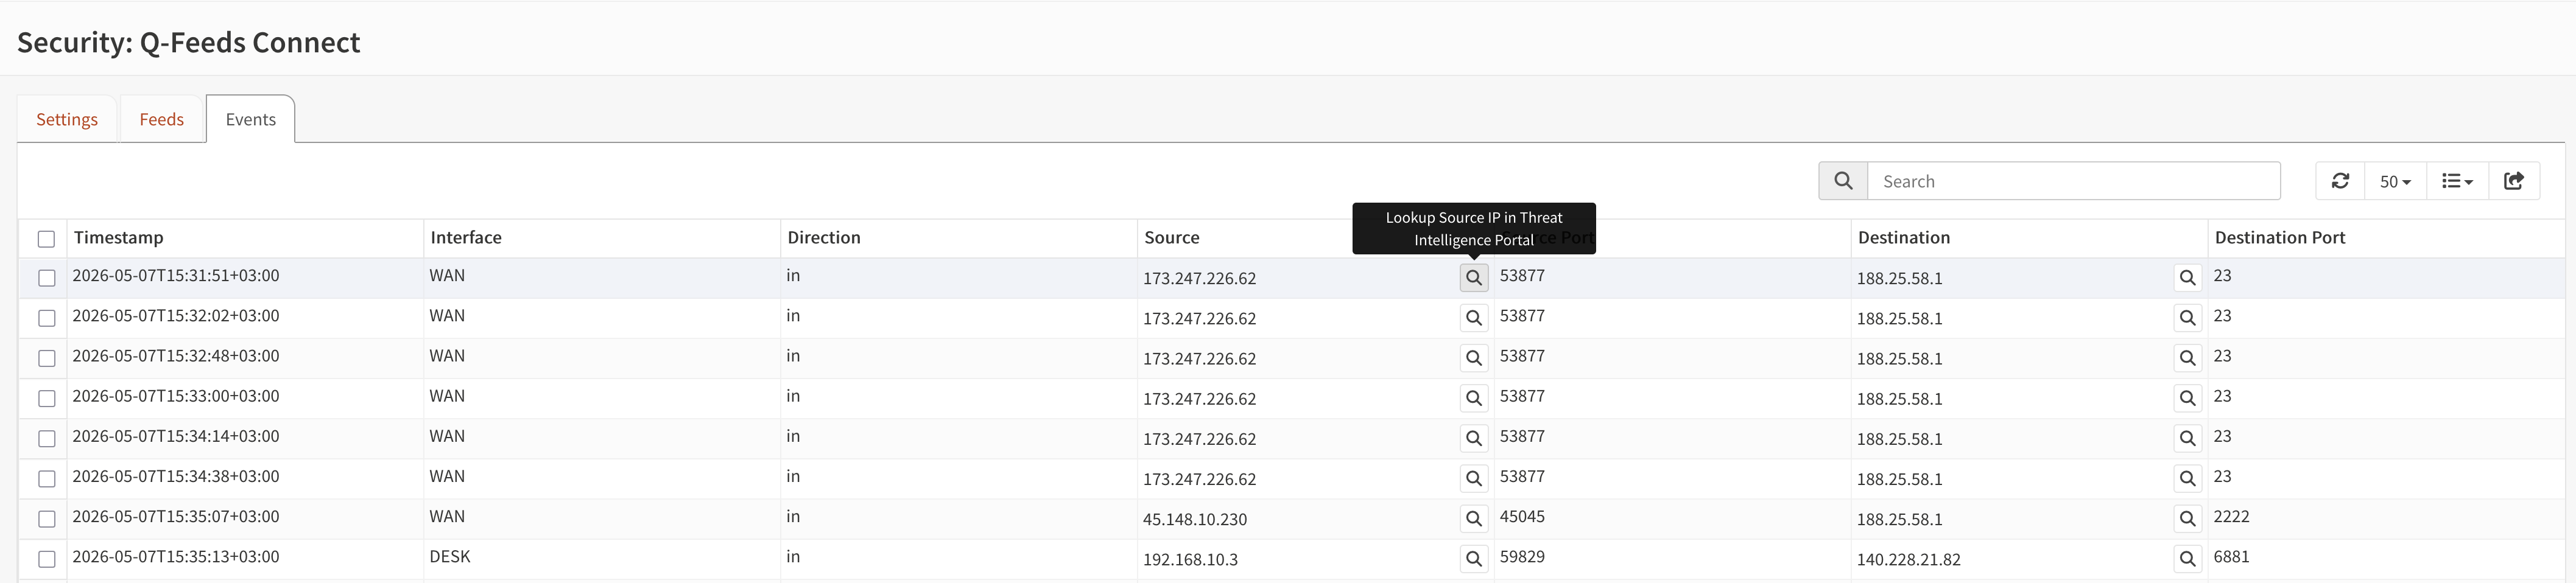
Once the rule is active, you should see the alias counter populate (typically tens of thousands of IPs) and traffic start flowing into the Q-Feeds events page:
Optional: WAN inbound block
Mostly cosmetic if you have no port forwards exposed (pf already drops unsolicited inbound), but generates clean log entries showing scans from known-bad IPs.
Firewall → Rules → WAN → Add:
| Field | Value |
|---|---|
| Action | Block |
| Interface | WAN |
| Direction | in |
| Source | alias __qfeeds_malware_ip |
| Destination | any |
| Log | ✓ |
| Description | Block Q-Feeds inbound |
Handling false positives
Don’t edit the block rule. Create an alias qfeeds_allowlist (Host(s) or Network(s)) with your exceptions, then add a Pass rule above the block:
- Action: Pass
- Source: any
- Destination: alias
qfeeds_allowlist - Description: Allowlist over Q-Feeds block
OPNsense quick rules match top-down and stop on first match, so the Pass above lets specific destinations through before the broader Block fires.
What “working” looks like in practice
On a clean home network, don’t expect a flood of blocks. Typical signal:
- A handful of inbound blocks per hour from scanning bots (if you have port forwards)
- Occasional outbound blocks from telemetry endpoints, ad networks that overlap with malicious infrastructure, or compromised IoT devices
- More activity on networks with lots of devices, BitTorrent traffic, or sketchy app installs
If after a week the events are nearly empty even though your verification tests pass — that’s preventative security working as intended. The value is the absence of incidents, not the dashboard counter.
What Parts 1 and 2 buy you together: DNS-layer blocks for domain-based threats and IP-layer blocks for IP-based threats, using the same intelligence source, applied across every VLAN through a single rule each. Low CPU cost. The catch: only devices that route through your firewall and use AdGuard for DNS get both layers. Devices using their own DNS (DoH/DoT to a public resolver, hardcoded
8.8.8.8) get the IP-layer block but not the domain-layer block — and they’re a much bigger slice of your network than you’d guess.
Part 3 — Closing the DNS bypass
This is the part the original post didn’t cover, and it’s the one that actually matters for security. Up to here, AdGuard is a DNS server that devices can use if they cooperate. Most modern hardware doesn’t:
- Chromecasts, smart TVs, and most IoT junk hardcode public DNS (
8.8.8.8,1.1.1.1) - Firefox auto-enables DoH (to Cloudflare or NextDNS) on first run
- Android with Private DNS configured speaks DoT to its configured server, ignoring DHCP
- Some apps embed their own DNS resolution entirely
After Part 3, every device on your network either uses AdGuard or fails to resolve. There’s no third option that doesn’t require deliberate technical effort to construct.
The four pieces, in order:
- NAT redirect — every outbound port 53 query is rewritten to AdGuard, transparently. Catches plain DNS bypass.
- Port 853 block — DoT and DoQ outbound dropped. Forces fallback to plain DNS, which hits the redirect.
- DoH IP block — TCP connections to ~500 known DoH endpoint IPs dropped. Catches DoH at the IP layer because you can’t block it by port.
- Firefox canary block — AdGuard returns NXDOMAIN for
use-application-dns.net, signalling Firefox to stay on plain DNS.
Each closes a different evasion path. Run all four and the gaps narrow to “manually configured DoH to a private endpoint,” which is no longer a default behavior on any consumer device.
A workflow note before starting: every time you change NAT or filter rules in OPNsense, two things need to happen for the change to actually take effect. First, click the orange Apply Changes banner at the top of the rules page — saving the rule alone doesn’t push it to pf. Second, reset the pf state table (Firewall → Diagnostics → States → Reset state table, or
pfctl -F statefrom the shell). Existing connections keep using the old NAT mapping until they expire; resetting forces fresh state creation under the new rules. I’ll remind you of this at the appropriate points but get in the habit early — most of the “why didn’t my rule take effect” troubleshooting traces back to one of these two steps being skipped.
Step 1 — NAT redirect of port 53 to AdGuard
This is the core piece. It’s also where I tripped over the most subtle gotchas, which I’ll surface inline.
First, decide your AdGuard binding strategy. Two options:
(A) Single-bind (recommended). AdGuard listens on exactly one IP, say 192.168.1.1 on your management VLAN. One redirect rule on LOCAL_VLANS targets that single IP. Cross-subnet response routing is clean because AdGuard’s listener has one source IP and the kernel never gets to pick a different one.
(B) Multi-bind with per-VLAN rules. AdGuard listens on every VLAN’s gateway IP (192.168.10.1, .20.1, etc.). One redirect rule per VLAN, each targeting that VLAN’s own gateway IP. More rules, but each VLAN’s traffic stays within its own subnet — eliminates a class of cross-interface response-routing issues that can occur with (A) depending on AdGuard’s response source handling.
If you’re starting fresh, do (A). It’s simpler and the failure modes are better understood. If you already have multi-bind and don’t want to change AdGuard, (B) works fine — you’ll have N rules instead of 1, and you’ll clone them per VLAN.
The walkthrough below uses (A). For (B), the only differences are: Interface is the specific VLAN per rule (not the group), Redirect Target IP is per-VLAN, and you create one rule per VLAN by cloning. The Source/Destination invert patterns, NAT Reflection setting, and other field values are identical.
Why the cross-subnet thing matters: with multi-bind AdGuard, the kernel — not AdGuard — picks the source IP of replies. For a packet destined to
192.168.1.1arriving from a client on192.168.10.x, the kernel may set the reply source to192.168.10.1(the interface closest to the client) instead of the original192.168.1.1. The pf NAT state expects192.168.1.1in the return path, sees192.168.10.1, and the reply doesn’t get un-translated. The client receives;; reply from unexpected source: 192.168.10.1#<random>, expected 8.8.8.8#53and dig fails. Single-bind sidesteps this because AdGuard’s listener is bound to exactly one IP — the kernel doesn’t get to choose. This is why (A) is the safer default.
Verify what AdGuard is listening on before configuring NAT
Before building NAT rules around AdGuard, confirm what it’s actually listening on. A surprising number of “redirect doesn’t work” cases trace to misunderstanding what port AdGuard is bound to.
From the OPNsense shell:
sockstat -l4 | grep -E "AdGuardHome|:53|:853"
Or if AdGuard is on a separate host:
ss -tulnp | grep -E ":(53|853|5353)\b"
You should see plain DNS on port 53 (TCP + UDP). If you also have DoT enabled, you’ll see port 853 too. The redirect rule we’re about to build targets port 53 — make sure that listener exists.
You can also test directly:
dig @192.168.1.1 -p 53 example.com
A real answer with ;; Query time: 0 msec confirms AdGuard is up and answering plain DNS on that IP+port. If this fails, fix AdGuard first; the redirect won’t help if the target isn’t responsive.
Create the adguard_host alias
Firewall → Aliases → Add
| Field | Value |
|---|---|
| Name | adguard_host |
| Type | Host(s) |
| Content | 192.168.1.1 (your single AdGuard IP) |
| Description | AdGuard Home listener |
Save and apply.
Create the redirect rule
Firewall → NAT → Destination NAT → Add
| Field | Value |
|---|---|
| Interface | LOCAL_VLANS |
| TCP/IP Version | IPv4 |
| Protocol | TCP/UDP (not “any” — pf can only rewrite ports on protocols that have ports) |
| Source / Invert Source | ✓ checked |
| Source Address | adguard_host |
| Source Port | any ⚠️ |
| Destination / Invert Destination | ✓ checked |
| Destination Address | adguard_host |
| Destination Port | DOMAIN (53) |
| Redirect Target IP | 192.168.1.1 (your AdGuard IP) |
| Redirect Target Port | DOMAIN (53) |
| Pool Options | Default |
| NAT Reflection | Disable ⚠️ |
| Firewall rule | Pass (auto-create the matching filter rule) |
| Category | DNS Enforcement |
| Set Tag | dns-enforcement |
| Log | ✓ (for now; turn off after verifying) |
| Description | [DNS-RDR] All VLANs → AdGuard @ 192.168.1.1 |
Save. Click Apply Changes in the orange banner. Then reset the state table (Firewall → Diagnostics → States → Reset state table) to clear any stale NAT state from before this rule existed.
The two ⚠️ fields above are where the rule lives or dies. I’ll explain each because I burned hours on both before figuring them out.
Why Source Port = any. This is the most common configuration mistake in OPNsense Destination NAT rules. The “Source Port” filter is the client’s source port, not the protocol’s port. DNS clients use ephemeral source ports (random high numbers like :52341); only the destination port is 53. If you set Source Port to 53 or DOMAIN, the rule only matches packets where the client also happens to be sending from port 53 — which is essentially never. The rule will silently never fire, your dig tests will mysteriously fail, and you’ll spend a long time chasing ghost SNAT theories. Leave Source Port blank or set it to any.
Why NAT Reflection = Disable. Reflection is for the classic hairpin scenario — an internal client reaching an external IP that port-forwards back inside. Your redirect target is already a local interface IP, no reflection needed. Some modes of “Enable” insert implicit source NAT into the redirected packet, randomly choosing an ephemeral source port. The un-translation on the return path doesn’t always come out clean, and dig reports reply from unexpected source: 192.168.X.1#<random>, expected 8.8.8.8#53. Disabling reflection avoids the entire mechanism.
Two more invert fields that matter. The Source Invert + Destination Invert combination, both pointed at adguard_host, means “any client (not AdGuard) querying any destination (not AdGuard) on port 53.” Without the source invert, AdGuard’s own upstream queries get caught and looped back to itself. Without the destination invert, queries already correctly aimed at AdGuard get pointlessly NAT’d through the same box.
Verify the rule is correctly loaded
The GUI shows what you configured. pfctl shows what’s actually running. From OPNsense → System → Diagnostics → Command Prompt:
pfctl -sn | tail -10
You want the last two lines to read approximately:
rdr pass log on LOCAL_VLANS inet proto tcp from ! <adguard_host> to ! <adguard_host> port = domain tag dns-enforcement -> 192.168.1.1 port 53
rdr pass log on LOCAL_VLANS inet proto udp from ! <adguard_host> to ! <adguard_host> port = domain tag dns-enforcement -> 192.168.1.1 port 53
Confirm specifically:
on LOCAL_VLANS(not a single VLAN)- Source clause is
from ! <adguard_host>with noport = X— that’s the Source Port fix - Target ends with
port 53— that’s the DOMAIN(53) destination port
If the source has port = domain in it, your Source Port field is set wrong; go back and fix it to any. If the target says port 853, you’ve redirected to AdGuard’s DoT port instead of plain DNS; fix to DOMAIN (53).
Test from a real client
dig @8.8.8.8 example.com
What success looks like:
- A real answer in the ANSWER SECTION
;; Query time: 0 msec(or 1ms — local AdGuard response);; udp: 4096in the OPT pseudosection (AdGuard’s EDNS signature — Google’s is 512)
The udp: 4096 is the cleanest fingerprint. If you see udp: 512 and a query time over 20ms, your dig actually reached Google and your redirect isn’t working. Check pfctl -sn again.
Confirm filtering applies through the redirect:
dig @8.8.8.8 <a-known-blocked-domain>
You should get 0.0.0.0, NXDOMAIN, or REFUSED (whichever block mode AdGuard is configured for), at 1ms. AdGuard’s Query Log should show the request from your client IP with “Blocked by Q-Feeds Malware Domains.”
If you get a real NXDOMAIN with a SOA record from the actual TLD nameserver and 40+ms latency, dig reached Google’s recursive resolver and your redirect didn’t fire. That means filtering isn’t applying to bypass-attempting traffic. Check the rule.
Confirm hardcoded IP simulation:
dig @1.1.1.1 example.com
dig @9.9.9.9 example.com
dig @208.67.222.222 example.com
All three should succeed instantly (AdGuard answered all of them) and all three should appear in AdGuard’s Query Log. This is the whole point of the redirect: every device’s choice of DNS server is irrelevant.
Repeat from a client on every VLAN. This is the verification that the LOCAL_VLANS group is doing its job, not just covering the VLAN you happen to be testing from. A quick checklist:
| VLAN | dig @8.8.8.8 example.com returns AdGuard signature? | dig @8.8.8.8 <blocked> returns block response? | Direct dig @<adguard-ip> works? | AdGuard log shows correct client IP? |
|---|---|---|---|---|
| MGMT | ||||
| VLAN10 | ||||
| VLAN20 | ||||
| VLAN30 |
Fill in ✓ or ✗ as you test each. Any ✗ means that VLAN’s traffic isn’t being redirected — usually a missing member in the LOCAL_VLANS group.
Exempt anything that needs to bypass the redirect
Some traffic legitimately needs to use a different DNS resolver than AdGuard. Common cases:
- Tailscale uses
100.100.100.100for MagicDNS resolution of*.ts.netnames - Corporate VPN clients with split DNS to specific internal resolvers
- Pi-hole or Unbound running alongside AdGuard for specific purposes
To exempt these, create a dns_redirect_exempt Host(s) alias containing the DNS server IPs that should bypass the redirect:
| Field | Value |
|---|---|
| Name | dns_redirect_exempt |
| Type | Host(s) |
| Content | 100.100.100.100 (and any other resolver IPs that shouldn’t be redirected) |
| Description | DNS resolvers that bypass the AdGuard redirect |
Then add a second Destination NAT rule above the main redirect rule, with the No RDR (NOT) flag checked:
| Field | Value |
|---|---|
| Interface | LOCAL_VLANS |
| Protocol | TCP/UDP |
| Source | any |
| Destination | dns_redirect_exempt |
| Destination Port | DOMAIN (53) |
| No RDR (NOT) | ✓ checked |
| Description | [DNS-RDR] Exempt - bypass redirect for trusted resolvers |
The “No RDR” flag tells pf “if this matches, explicitly skip all subsequent RDR processing.” Since pf evaluates RDR rules top-down with first-match-wins, the exemption rule catches matching traffic before the main redirect rule has a chance.
If you don’t use any of these tools today, you can skip this step — but know the pattern exists for when you add Tailscale or a VPN client later.
What you’ve added
DNS bypass via hardcoded resolvers is now closed. Anything sending plain DNS to anywhere lands in AdGuard. Devices that didn’t cooperate with your DHCP settings now cooperate by force.
What you’ve also added: AdGuard is now load-bearing. If it goes down, DNS network-wide goes down. Plan accordingly.
A note on DHCP
Your DHCP servers on each VLAN probably hand out the local gateway as the DNS server (192.168.10.1 on VLAN 10, etc.). With single-bind AdGuard now listening only on 192.168.1.1, those local-gateway IPs no longer have a DNS server bound. Two options:
- Leave DHCP as-is. Clients keep being told their local gateway is DNS. Their queries hit no listener, get redirected by your new NAT rule to
192.168.1.1, AdGuard answers. The redirect picks up all this traffic — slightly more NAT table activity, but works fine. - Update DHCP on each VLAN to hand out
192.168.1.1directly. Then the redirect only fires on bypass attempts (Chromecasts hardcoded to8.8.8.8, etc.) rather than every legitimate query. Cleaner NAT table, slightly more DHCP config to maintain.
Either works. I leave DHCP as-is on home networks because the redirect is doing its job either way; the cleaner version is mostly aesthetic.
Step 2 — Block port 853 (DoT and DoQ)
DNS-over-TLS uses 853/tcp. DNS-over-QUIC uses 853/udp. Both are encrypted DNS over a port that nothing legitimate on a home network needs outbound.
Firewall → Rules → LOCAL_VLANS → Add:
| Field | Value |
|---|---|
| Action | Block |
| Quick | ✓ |
| Interface | LOCAL_VLANS |
| Direction | in |
| TCP/IP Version | IPv4+IPv6 |
| Protocol | TCP/UDP |
| Source | any |
| Destination | any |
| Destination port range | 853 to 853 (type as custom port — no preset) |
| Log | ✓ |
| Category | DNS Enforcement |
| Description | [DNS-ENF] Block outbound DoT/DoQ (port 853) |
Save, click Apply Changes, and reset states again.
Rule order on LOCAL_VLANS:
- Allowlist passes (qfeeds_allowlist, dns_redirect_exempt if any)
- Q-Feeds malicious IP block
- Block port 853 ← new
- (Block DoH IPs ← Step 3)
- Existing pass-out rules
The block rules need to sit above any general “allow LAN to any” rule, otherwise the allow rule fires first and the block never matches.
Verify
nc -vz -w 5 1.1.1.1 853
Rule disabled: Connection to 1.1.1.1 port 853 [tcp/domain-s] succeeded! — TCP handshake completes against Cloudflare.
Rule enabled: Hangs for 5 seconds, then prints Operation timed out. pf silently drops the SYN; client gets no response.
The silent-drop behavior (rather than a TCP RST) is intentional — DoT-aware clients fall back to plain DNS gracefully when 853 is unreachable.
Don’t test with
dig +tcp -p 853 .... That sends plain DNS-over-TCP to a port expecting TLS; Cloudflare resets the connection regardless of whether your firewall blocks it. The behavior looks identical with rule on and off, and you’ll get confused. Usenc -vzfor TCP reachability tests.
What you’ve added
DoT and DoQ bypass closed. Android Private DNS configured for dns.google or one.one.one.one will fail to reach its configured server.
Caveat — Android Private DNS. If you have Android devices with Private DNS configured (not “Automatic”), they will refuse to consider your network healthy because their configured DoT server is unreachable. Symptom: “No internet” indicator on WiFi even though everything else works. Fix on the device: set Private DNS to Automatic or Off. Configured Private DNS = Automatic falls back to DHCP-supplied DNS, which goes through your redirect.
Step 3 — Block known DoH endpoint IPs
DoH rides on 443/tcp inside TLS. You can’t block it by port without breaking the web, so you block by IP using a maintained list of known DoH servers.
Create the IPv4 alias:
Firewall → Aliases → Add
| Field | Value |
|---|---|
| Name | doh_endpoints_v4 |
| Type | URL Table (IPs) |
| Categories | DNS Enforcement |
| Refresh Frequency | Days: 1 |
| Content | https://raw.githubusercontent.com/dibdot/DoH-IP-blocklists/master/doh-ipv4.txt |
| Description | Known DoH server IPs (dibdot, daily refresh) |
Save. Wait 30 seconds for the first fetch.
If you run IPv6, add a second alias doh_endpoints_v6 pointing at .../doh-ipv6.txt.
Verify the alias loaded:
pfctl -t doh_endpoints_v4 -T show | wc -l
Should be several hundred. If 0, the fetch failed — check that AdGuard isn’t blocking raw.githubusercontent.com and that OPNsense has WAN connectivity to GitHub.
Add the block rule:
Firewall → Rules → LOCAL_VLANS → Add:
| Field | Value |
|---|---|
| Action | Block |
| Quick | ✓ |
| Interface | LOCAL_VLANS |
| Direction | in |
| TCP/IP Version | IPv4 |
| Protocol | TCP |
| Source | any |
| Destination | doh_endpoints_v4 |
| Destination port range | any |
| Log | ✓ |
| Category | DNS Enforcement |
| Description | [DNS-ENF] Block known DoH endpoints (IPv4) |
Save. Duplicate with IPv6 + doh_endpoints_v6 if applicable. Apply changes, reset states.
Verify
Test 1 — raw TCP reachability:
nc -vz -w 5 1.1.1.1 443
Rule disabled: succeeds. Rule enabled: hangs and times out.
Test 2 — actual DoH attempt:
curl -v --max-time 5 'https://cloudflare-dns.com/dns-query?name=example.com&type=A' -H 'accept: application/dns-json'
With the rule active you’ll see:
* Host cloudflare-dns.com:443 was resolved.
* IPv4: 104.16.248.249, 104.16.249.249
*   Trying 104.16.248.249:443...
* ipv4 connect timeout after 2482ms, move on!
*   Trying 104.16.249.249:443...
* Connection timed out after 5001 milliseconds
Notice the DNS resolution worked fine (curl got the IPs back from your AdGuard via the Step 1 redirect — AdGuard has no opinion on the hostname itself). The blocking happens at the IP layer when curl tries to connect to those IPs. A working DoH query returns a JSON blob with {"Status":0, "Answer": [...]} in under 50ms. Yours returns nothing because Cloudflare’s DoH IPs are now unreachable.
What you’ve added
DoH to known providers (Cloudflare, Google, Quad9, NextDNS, Mullvad, AdGuard DNS public, and ~500 others on the dibdot list) closed at the IP layer. The list refreshes daily.
Caveat — false positives are possible but rare. If a service you legitimately use happens to share an IP with a DoH provider (a colo neighbor, an unfortunate CDN overlap), it’ll be blocked too. Symptom: a specific site suddenly fails; the firewall log shows the IP. Fix: a doh_allowlist alias with the exception, plus a pass rule for that alias placed above the DoH block.
Caveat — 1.1.1.1 and 8.8.8.8 as IPs are now blocked for non-DNS HTTPS traffic. They’re on the list because Cloudflare and Google both run DoH at those IPs. Plain port 53 traffic to those IPs still works (Step 1’s redirect catches it first and rewrites to AdGuard). HTTPS not to those IPs is unaffected.
Step 4 — Block the Firefox canary at AdGuard
Firefox auto-enables DoH (to Cloudflare or NextDNS) on first run unless the network operator signals otherwise. Mozilla’s agreed-upon signal: return NXDOMAIN, 0.0.0.0, or REFUSED for the special canary domain use-application-dns.net.
AdGuard Home → Filters → Custom filtering rules. Add:
||use-application-dns.net^
Save.
Verify
nslookup use-application-dns.net
Returns 0.0.0.0, NXDOMAIN, or REFUSED depending on your AdGuard block mode. AdGuard’s Query Log shows “Blocked by custom filtering rules.”
What you’ve added
Firefox’s auto-DoH behavior on first run / new profile / fresh install is disabled. New Firefox installs respect your network’s DNS policy automatically.
This doesn’t catch a user who manually goes to Settings → Privacy & Security and enables DoH. That case is caught by Step 3 (the DoH IP block). Together: canary handles intent (“Firefox, should I use DoH?”), IP block handles execution (“can I reach a DoH server?”). Both paths shut.
Coverage matrix
After all four steps in Part 3, a device on your network can reach external DNS via:
| Path | Caught by |
|---|---|
| Plain DNS (port 53) to anywhere | Step 1 (redirect) |
| DoT (port 853 tcp) | Step 2 (port block) |
| DoQ (port 853 udp) | Step 2 (port block) |
| DoH to a known public provider | Step 3 (IP block) |
| Auto-enabled DoH in Firefox | Step 4 (canary) |
| Manually-configured DoH to a known public provider | Step 3 |
| Manually-configured DoH to a private/unlisted endpoint | Not caught |
That last row is the residual gap. Reputation lists can’t catch a DoH server an attacker spun up yesterday on a fresh VPS using a clean domain. Behavioral detection (Suricata signatures, CrowdSec scenarios) is what closes it, and it’s a separate project with its own ongoing maintenance.
For commodity threats and IoT-grade malware, Steps 1–4 raise the bar enough that 80%+ of opportunistic stuff hits something on the way out. For a targeted attacker with custom tooling, you’ve slowed them down but not stopped them.
What you actually gained, honestly
Visibility. AdGuard’s Query Log is now ground truth for your network. Per-device, per-domain, with timestamps. Devices that previously talked to Google over DoH and were invisible to your filtering are now in the log. The first time you look at your IoT VLAN’s DNS history and notice a smart bulb querying a known telemetry endpoint thousands of times a day, you’ll understand the value.
Filtering actually applies. Q-Feeds, your custom blocklists, parental controls — they now apply network-wide instead of just to the well-behaved devices.
Compromised-device containment. Malware on your network has to phone home using either plain DNS (caught by AdGuard + Q-Feeds at DNS layer), a known-bad domain (same), a known-bad IP (caught by Q-Feeds at packet layer), or a known-bad DoH provider (caught by Step 3). The remaining option — clean domain on a clean IP using DoH to a private endpoint — is a real technical bar that filters out the bottom 80% of commodity threats.
What it costs you
Single point of failure. AdGuard is now load-bearing. If it dies, DNS dies network-wide. Have a recovery plan — at minimum, know how to disable the redirect rule from your phone if you can’t get to a computer.
Operational ownership. You now own DNS for your household. AdGuard’s uptime, its block list curation, its upgrades — all yours.
Friction with specific configurations:
- Tailscale, corporate VPNs with split DNS — exempt them with a
No RDRrule sourced from adns_redirect_exemptalias (covered in Step 1) - Android Private DNS configured to a specific server (not “Automatic”) — will fail until set to Automatic or Off
- Firefox users who actively want DoH for privacy from you (the network operator) — no longer an option for them on your network
- Occasional false-positive on the DoH IP list — keep a
doh_allowlistalias ready
Token and config sprawl. Q-Feeds API token in two places (AdGuard custom blocklist URL, OPNsense plugin config). Both ride along in config backups. Rotate periodically.
Maintenance surface. You went from “AdGuard configured once, mostly forgotten” to a stack of NAT rule + block rules + custom filter + URL Table aliases + categories + interface group. Adding a new VLAN means adding it to LOCAL_VLANS (the rules then cover automatically — that part is fine).
Where to go from here
A few next steps that meaningfully improve the setup, in rough priority order:
Synthetic monitoring. A cron job that hourly resolves a known-blocked domain and tries to curl --connect-timeout 3 to a known-bad IP, then alerts (ntfy / Discord webhook / email) if either succeeds. Catches silent failure modes — feed didn’t refresh, AdGuard custom list returned 0 rules, pf table got truncated. The most valuable improvement because it’s what surfaces problems before you notice them.
Local feed mirror. A small cron script that pulls Q-Feeds (+ dibdot, + any others you adopt) every few hours, validates the responses, serves cached copies over local HTTP. AdGuard and OPNsense point at the local mirror. Token lives in one place. You get a last-known-good cache during upstream outages. Refresh failures become detectable.
Behavioral defense (CrowdSec or Suricata). Closes the “case #5” gap. CrowdSec via os-crowdsec-bouncer plugin is the lower-effort option; community blocklist has low false-positive rates because it’s behavior-derived. Suricata with ET Open rules is heavier setup but sees outbound C2 patterns that pure reputation can’t.
Log shipping. Loki + Grafana (or Graylog) ingesting AdGuard’s query log and OPNsense’s filter log. Lets you answer “which device tried to resolve N malicious domains this week” — find a compromised IoT device by behavioral pattern instead of by noticing it.
TL;DR
Q-Feeds gives you a DNS+IP threat feed. AdGuard applies the DNS half. OPNsense applies the IP half. Without Part 3, both apply only to devices that cooperate with your DNS settings, which on a modern network is a minority. With Part 3 (NAT redirect + port 853 block + DoH IP block + Firefox canary), every device either uses AdGuard or fails to resolve. You gain real visibility and consistent filtering across heterogeneous devices. You take on operational responsibility for DNS for your whole network. Plan for AdGuard being load-bearing, and add synthetic monitoring before you forget how all of this works.